Showing posts with label recipe. Show all posts

Sunday, 24 June 2012

Blondie Explosion

I like to bake and make and all kinds of different things but baking is something that soothes my soul.

Anyway I make blondies, courtesy of The Hummingbird recipe book


Ingredients
150g white chocolate, roughly chopped
125g unsalted butter
150g caster sugar
2 eggs
1 (1/2) teaspoons of vanilla extract
a pinch of salt ( i think this is optional and personally don't bother, never had any complaints either)
120g shelled pecan nuts, chopped

33*23*5cm baking tray, lined with grease proof paper

Method
1.Pre-heat the oven to 170 dg C (325 dg F) Gas 3
2.Put the chocolate and butter into a bowl and sit over a pan of simmering water. DO NOT let the bowl and the water connect. It will be ruined and you might as well give up now and start again! Leave until melted and smooth.
3. Remove from heat
4. Add the sugar and stir until well incorporated
5. Add the eggs and vanilla extract, stirring briskly if the mixture looks like its starting to split. (Personally I always get a hand blender involved at this stage. I have never been able to avoid the splitting but when you do make sure that you wear an apron melted butter will splat everywhere!)
6. Add the flour, salt and pecan nuts and stir until well incorporated.
7. Add the magic- this is where I add my own ingredients to make it my own, dried, sweetened cranberries (200g) are delicious and the specs of red look pretty good too. Other dried fruit will probably go quite well with white chocolate I've yet to try blueberries but there are on my list of experiments to try!
8. Spoon the mixture into the prepared baking tray and bake in the preheated oven for about 35-40 minutes, or until golden brown and the centre is soft.
9. Leave to cool completely. Instruct your family to leave the home for the next couple of hours, grab a bottle of nice wine and a movie and most importantly
10. ENJOY


Husband likes them too and has commissioned me on occasion to make them for his team. On this particular occasion however I was busy playing catch up with work and providing support on a consultancy basis. 

Husband and I differ in our approach. I am, I believe, a much tidier baker than he is.


You'll notice that the pecan nuts need to be chopped in the recipe above. Husband came through with his nuts in a bag. I should probably explain that his approach to baking is very much that a recipe is for guideline purposes where as I like to stick to the recipe to get the best result.

Clearly he is more creative than I am when it comes to baking and cooking.

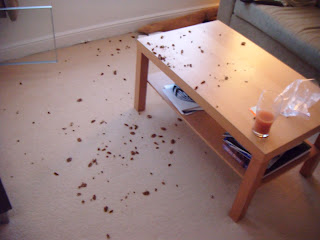
I could tell where he was going with this. By smashing the bag off of our cheap Ikea coffee table he was hoping that this would be a quick and effective route to the chopping exercise. 

I let him hit the table once, hard. As he raised the bag to strike it a second time I opened my mouth to warm him that it probably wasn't a good idea when this happened:

Leaving us with a living room that looked like this:


While I find baking therapeutic Husband finds it frustrating, especially after showering both of us in Pecans. 

When I asked if he was going to clean the mess up. He quickly said "No- have too much to do" and went back into the kitchen leaving me to clean it up.

I think he hopes that in making a huge mess and leaving me to clean it up that I will do less consultancy and be more hands on. 

I can only laugh. 

In fact I nearly cried when re-reading it to Husband.

Saturday, 21 January 2012

Holy McHomous

I have in under 5 minutes made the most delicious homous ever.

This is blog worthy because it is not the first time I have tried this.

The first time was a disaster. You could have used it to build a wall with.

So here is my success story recipe for homous.

- 1 small can of chickpeas.
- 1 table spoon of lazy crushed garlic
-1 table spoon of olive oil
-1/2 a table spoon of lime juice (o.k it is meant to be lemon but hey it is what we had left in the fridge so we worked with it.)
- dash of salt
-Half a can of the water/juice that the chickpeas came in (DO NOT DRAIN THIS MAGIC STUFF AWAY)

Throw all of it in, except the chickpea juice, and blitz until its looking a bit rough and ready but smooth-ish. Add the chickpeas juice and re blitz- it will go from nearly smooth to completely smooth and delicious!!!

Sunday, 11 December 2011

PS Ho Ho Hot!

I made Chilli Jam. I think I might have mentioned this yesterday.

It looks fantastic. We are still to taste it though so fingers crossed it tastes as good as it looks. Oatcakes and cheese. Yummy!

What is worth mentioning for anyone considering making this fabulously looking treat please take the following advise very seriously:

1. Use a processor.
2. If you don't have a food processor then for the love of all things culinary use rubber gloves.

I don't have a food processor.

I didn't use rubber gloves.

Today I exfoliated my hands in salt.
Rinsed them in cold water.
And then spent 40 minutes with my hands in a bowl of milk shouting instructions through to husband in the kitchen on how to deal with the biscotti.

The shortbread is off the list. Christmas Star buscuits, biscotti and the jam. . .

I made the jam last night and 24 hours later I am only just getting over a new kind of burn. Oh and did I mention that i am not allergic to chilli's.

Scarily the advise on line was to use bleach. Neat.

I'll repeat that: neat bleach.

That is not bleach that is pretty cool but straight unadulterated bleach. On your skin. To remove the remnants of chilli.

I finely, very finely chopped 3 bags of red, deseeded chilli's to the tune of 150g. And have spent all of Sunday recovering from it.

PLEASE USE A FOOD PROCESSOR OR RUBBER GLOVES!!!!!!

Saturday, 10 December 2011

Ho Ho Hot!


Last Christmas I made over 100 cupcakes to give away as presents to friends and family.

This Christmas I am making mini hampers. With Chilli jam, biscotti, spiced biscuits and shortbread. For fans of tea and coffee some treats to go with them. With the exception of the chilli jam of course!

I have never made chilli jam.

I have never made biscotti.

I have never made short bread.

Tonight I made my first ever set of chilli jam. It it hot. It is jarred and cooling and setting just now. For the last 2 hours my fingers have been tingling and swealing. The recipe says to use a food processor for a reason- please for the love of all your digits use a processor.

This is far worse that dicing 12 onions.

Than dicing 1200 onions.

Than dicing 120,000 onions...

My lips have that Angelina Jolie bee-stung look about them. While my fingers have that Ranulph Fiennes pre op look about them (controversial much?). I am prepared to spend the rest of the evening getting freezer burn on them to reduce the swealing and take the burning sensation away. Thankfully I have managed not to rub my eyes. I should add that as far as I am aware the only thing I am allergic to is pollen.

They look amazing all my little ruby coloured jars glinting on the window sill. I am sure it will taste sensational. One of my dear friends will be getting the first sample this week, fingers crossed...


Anyway for the curious, courtesy of Nigella, here is the recipe for Chilli Jam:

INGREDIENTS

  • Gluten Free
  • Nigella Recipe
  • Vegetarian
  • 150g long fresh red chillies, each deseeded and cut into about 4 pieces.
  • 150g red peppers, cored, deseeded and cut into rough chunks
  • 1kg jam sugar
  • 600ml cider vinegar
  • 6 x 250ml sealable jars, with vinegar-proof lid, such as Kilner jar or re-usable pickle jar

METHOD

Serves: Makes approx. 1.5. Litres
  1. Sterilize your jars and leave to cool.
  2. Put the cut-up chillies into a food processor and pulse until they are finely chopped. Add the chunks of red pepper and pulse again until you have a vibrantly red-flecked processor bowl.
  3. Dissolve the sugar in the vinegar in a wide, medium-sized pan over a low heat without stirring.
  4. Scrape the chilli-pepper mixture out of the bowl and add to the pan. Bring the pan to the boil, then leave it at a rollicking boil for 10 minutes.
  5. Take the pan off the heat and allow it cool. The liquid will become more syrupy, then from syrup to viscous and from viscous to jelly-like as it cools.
  6. After about 40 minutes, or once the red flecks are more or less evenly dispersed in the jelly (as the liquid firms up, the hints of chilli and pepper start being suspended in it rather than floating on it), ladle into your jars. If you want to stir gently at this stage, it will do no harm. Then seal tightly.